Installation
Download the installer for your platform and run it — no build tools, no terminal commands, no dependencies to install.
Step 1: Download
Go to the GitHub Releases page and download the latest version for your OS:
| Platform | File | Notes |
|---|---|---|
| Windows | .msi or .exe | Double-click to install. You may need to click "More info" → "Run anyway" on the SmartScreen prompt. |
| macOS | .dmg | Open the DMG, drag ContextuAI Solo to Applications. On first launch, right-click → Open to bypass Gatekeeper. |
| Linux | .AppImage or .deb | For AppImage: chmod +x then run. For .deb: sudo dpkg -i contextuai-solo.deb |
Step 2: Launch
Open ContextuAI Solo from your applications. On first launch, the Setup Wizard guides you through choosing an AI provider and configuring your profile. That's it — you're ready to go.
Building from Source (Advanced)
If you prefer to build from source (contributors, developers):
Setup Wizard
On first launch, a 3-step wizard walks you through configuration:
- Profile — Enter your name, business name, and select your industry (16 options: SaaS, E-commerce, Healthcare, Finance, Education, Marketing, Consulting, Real Estate, Legal, Manufacturing, Non-Profit, Freelancing, and more)
- AI Provider — Choose how you want to run AI:
Built-in Local AI Free · No Setup
Solo ships with a built-in Model Hub — 41 prebuilt GGUF models ready to download, plus access to 140,000+ GGUF models on Hugging Face. No API keys, no external tools, no Ollama, no Python — just pick a model, click download, and start chatting. Everything runs on your CPU, fully offline.
This is the fastest way to get started. The wizard lets you pick a recommended model based on your RAM:
Your RAM Recommended Model Download Size 4-8 GB Qwen 3.5 0.8B or Gemma 3 1B ~700 MB 8-16 GB Qwen 3 8B or DeepSeek R1 7B ~4-5 GB 16-32 GB Gemma 3 12B or Qwen 3 14B ~7-9 GB 32+ GB Gemma 4 31B or DeepSeek R1 32B ~16-20 GB New: Gemma 4 — Google's latest model family (April 2026). Gemma 4 E4B offers thinking mode and native tool calling in an efficient 4B-active package. Gemma 4 31B is one of the strongest open models available — #3 on Arena AI. Both run fully on CPU inside Solo.Cloud Providers BYOK
If you have API keys from cloud providers, you can add them for access to the latest frontier models:
- Anthropic Claude — Sonnet 4, Opus, Haiku (Get API key)
- OpenAI — GPT-4o, GPT-4o Mini, GPT-4 Turbo, o1-preview (Get API key)
- Google Gemini — 2.0 Flash, 2.0 Pro, 1.5 Flash (Get API key)
- AWS Bedrock — Claude and Titan models
- Ollama — If you already run Ollama locally, Solo can connect to it as an additional provider
You can use local + cloud together — switch between them anytime from the model dropdown in chat.
- Brand Voice — Define your target audience, content topics, and brand tone
Your First Chat
After the wizard, you land on the Chat page:
- Type a message in the input box at the bottom
- Select an AI model from the dropdown (shows provider badges: Local/Cloud)
- Optionally pick a persona to give the AI specialized context
- Press
Enterto send — the AI streams its response in real-time
Conversations are saved as sessions in the left sidebar, grouped by date with message counts.
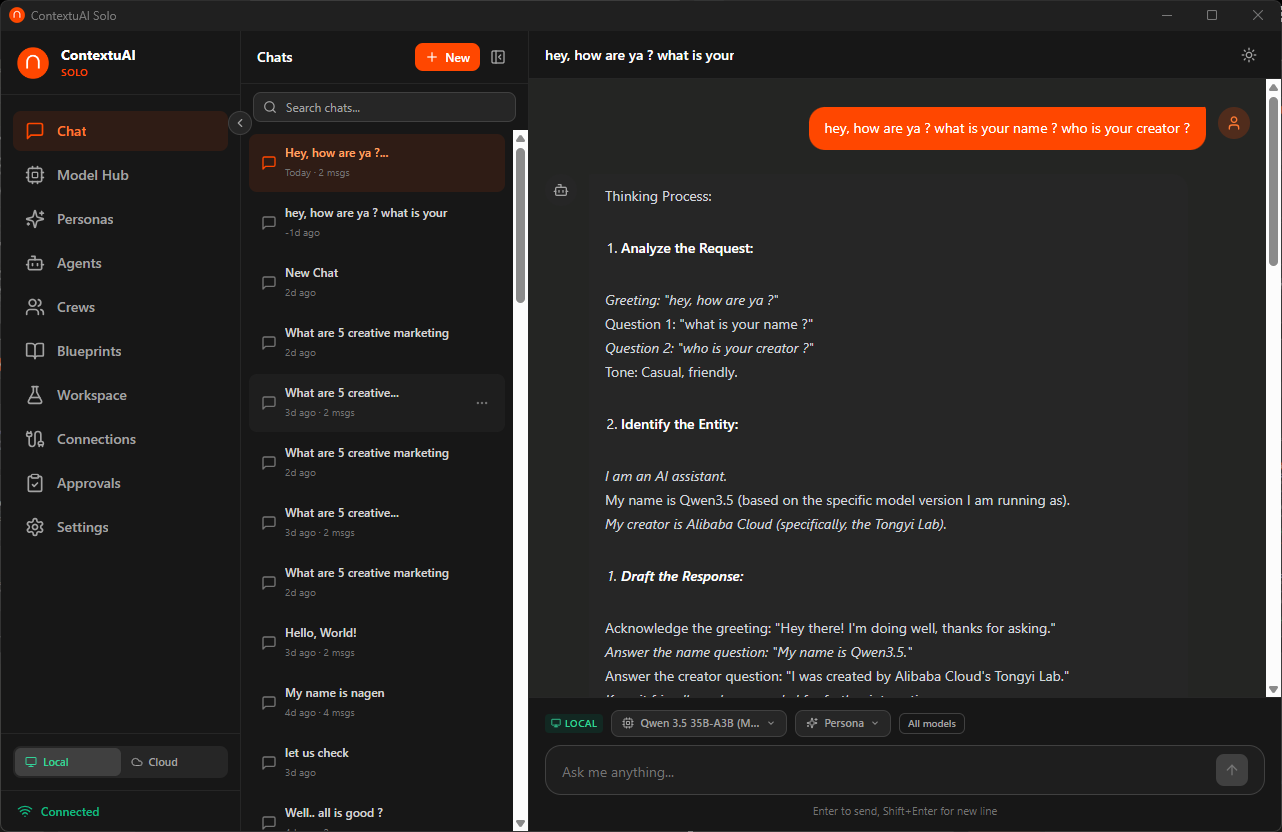
The main chat interface with model selector, persona picker, and session sidebar
AI Chat
The chat interface is the heart of Solo:
- Multi-model support — Switch between providers and models mid-conversation using the dropdown
- Real-time streaming — Responses appear token-by-token; click the stop button to abort
- Session management — Create, rename, archive, delete, and search sessions from the sidebar
- Persona selection — Attach a persona to give the AI access to your database, API, or custom instructions
- Markdown rendering — Code blocks with syntax highlighting, tables, lists, and rich formatting
- Thinking mode — Models that support reasoning (Qwen 3, DeepSeek R1) show a collapsible thinking section
- Dark/Light mode — Toggle from the top bar; applies across all pages
Ctrl+N (or Cmd+N) to start a new chat instantly. Use Shift+Enter for a new line without sending.Model Hub
Configure cloud AI providers and download local models from Settings → AI Providers.
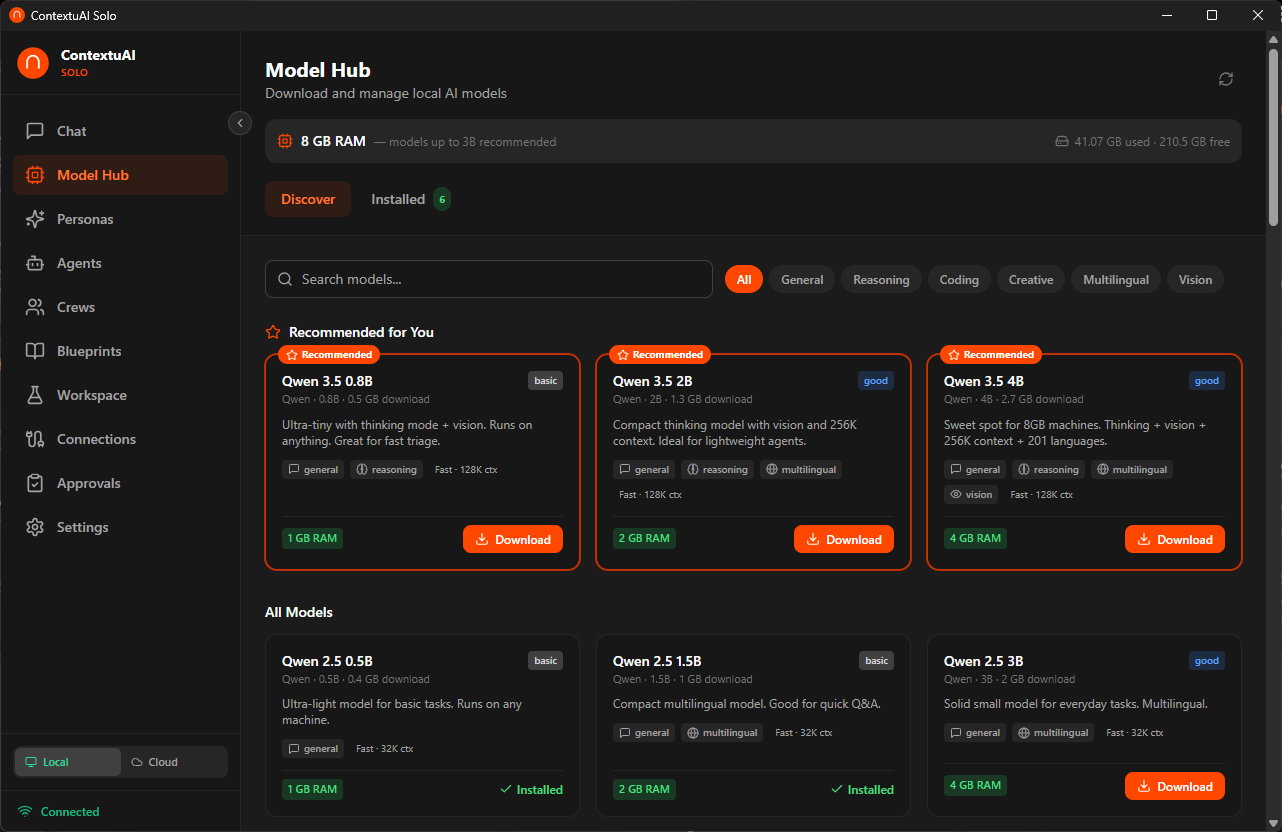
Browse and configure AI models — cloud providers and local GGUF models
Cloud Providers
Enter your API key for any supported provider. Click Test Connection to verify it works. Toggle the active provider to set your default model.
Local Models
Download GGUF models with one click. Solo auto-detects your RAM and recommends compatible models. Progress is shown in real-time during download.
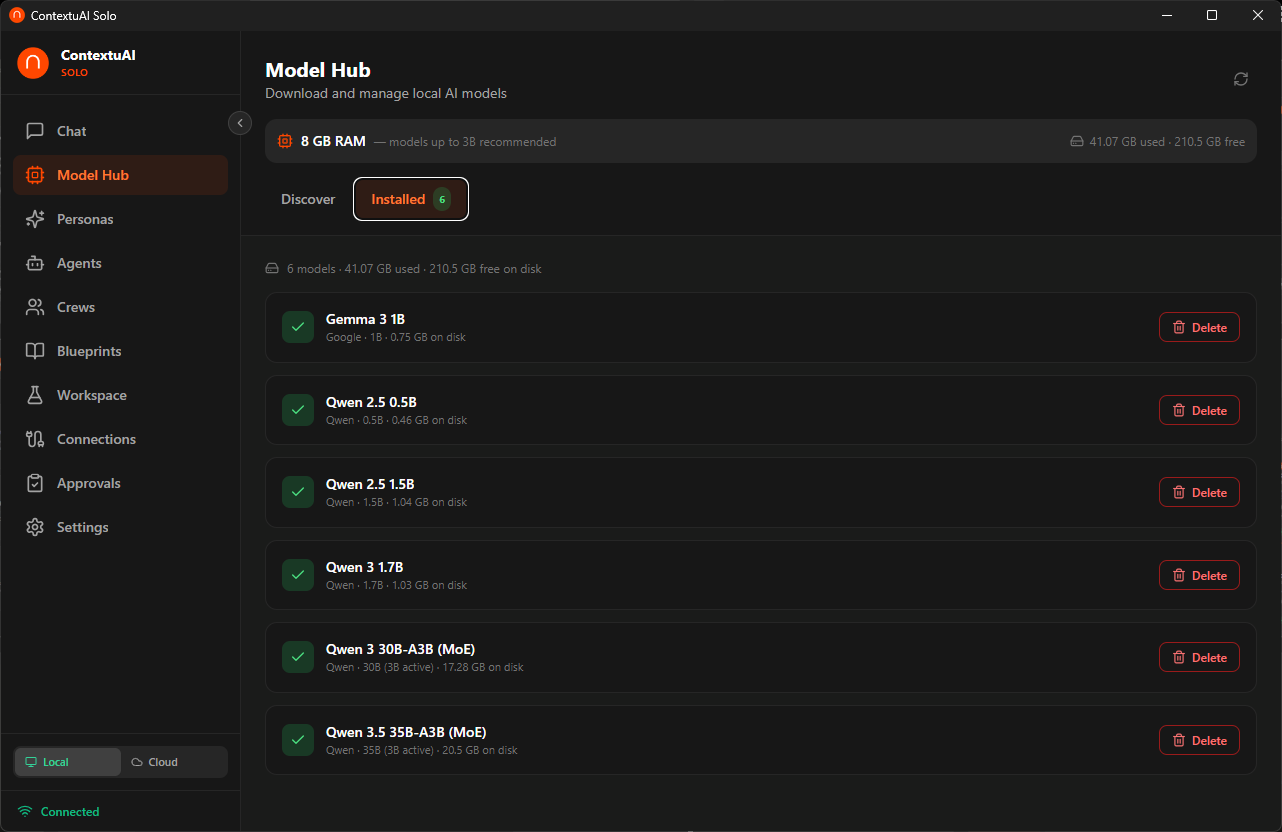
Manage installed local models — sync status, storage usage, ready to chat
AI Mode Toggle
Switch between Local and Cloud mode. In local mode, all inference runs on your CPU — no internet required after model download.
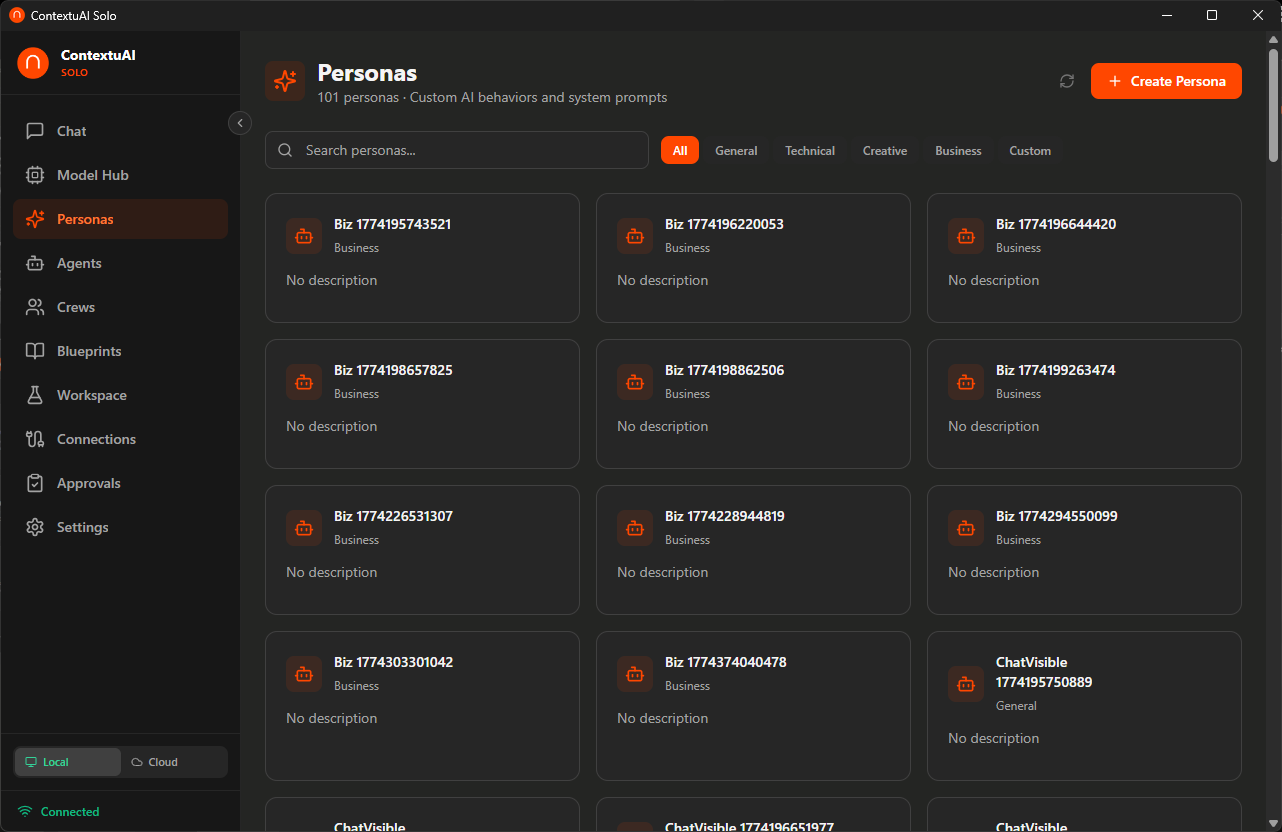
Personas
Personas are AI identities that connect to your real systems. Solo includes 12 persona types:
| Persona Type | What It Does |
|---|---|
| Nexus Agent | General-purpose AI with custom system prompts |
| Web Researcher | Search the web and scrape pages |
| PostgreSQL | Query PostgreSQL in natural language — AI writes the SQL |
| MySQL | Query MySQL databases with auto-generated SQL |
| MSSQL | Connect to Microsoft SQL Server |
| Snowflake | Query your Snowflake data warehouse |
| MongoDB | Query MongoDB document databases |
| GitHub | Browse repos, issues, and pull requests |
| GitLab | Access repos and CI/CD pipelines |
| API Connector | Call any REST API endpoint |
| File Operations | Read, write, and parse local files |
| Slack | Send and read messages in Slack channels |
Agent library showing all agent types and kinds
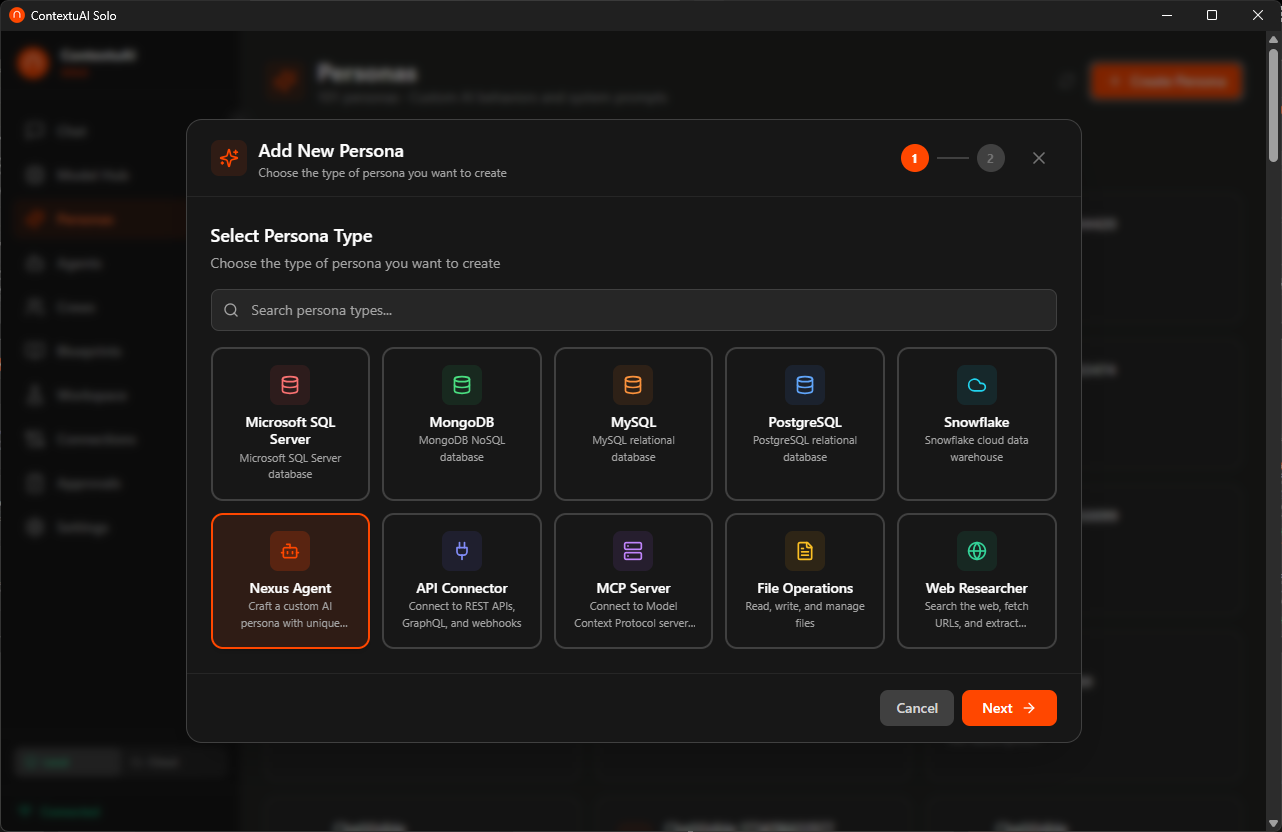
Creating a Persona
Solo uses a 2-step wizard:
- Choose Type — Select from the persona type dropdown (each type shows an icon and description)
- Configure Details — Enter name, category, description, connection credentials, and system prompt
For database types, use the Test Connection button to verify credentials before saving.
Create agent — select type, configure settings, and customize
Agent Library
Solo ships with 96 prebuilt business agents across 12 business categories, plus you can create unlimited custom agents. Each has a specialized system prompt, recommended model, and tool configurations.
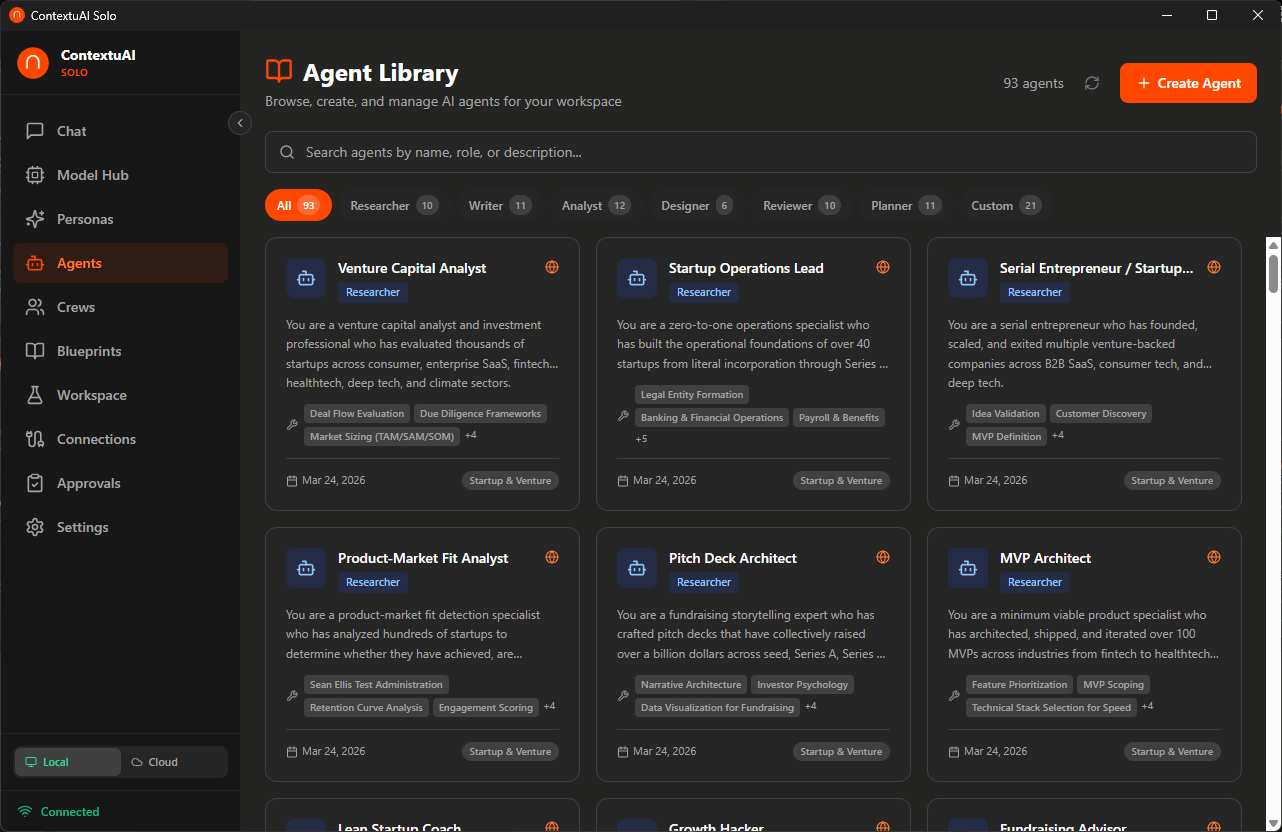
Browse 96 prebuilt agents across 12 business categories — search, filter by role, view details
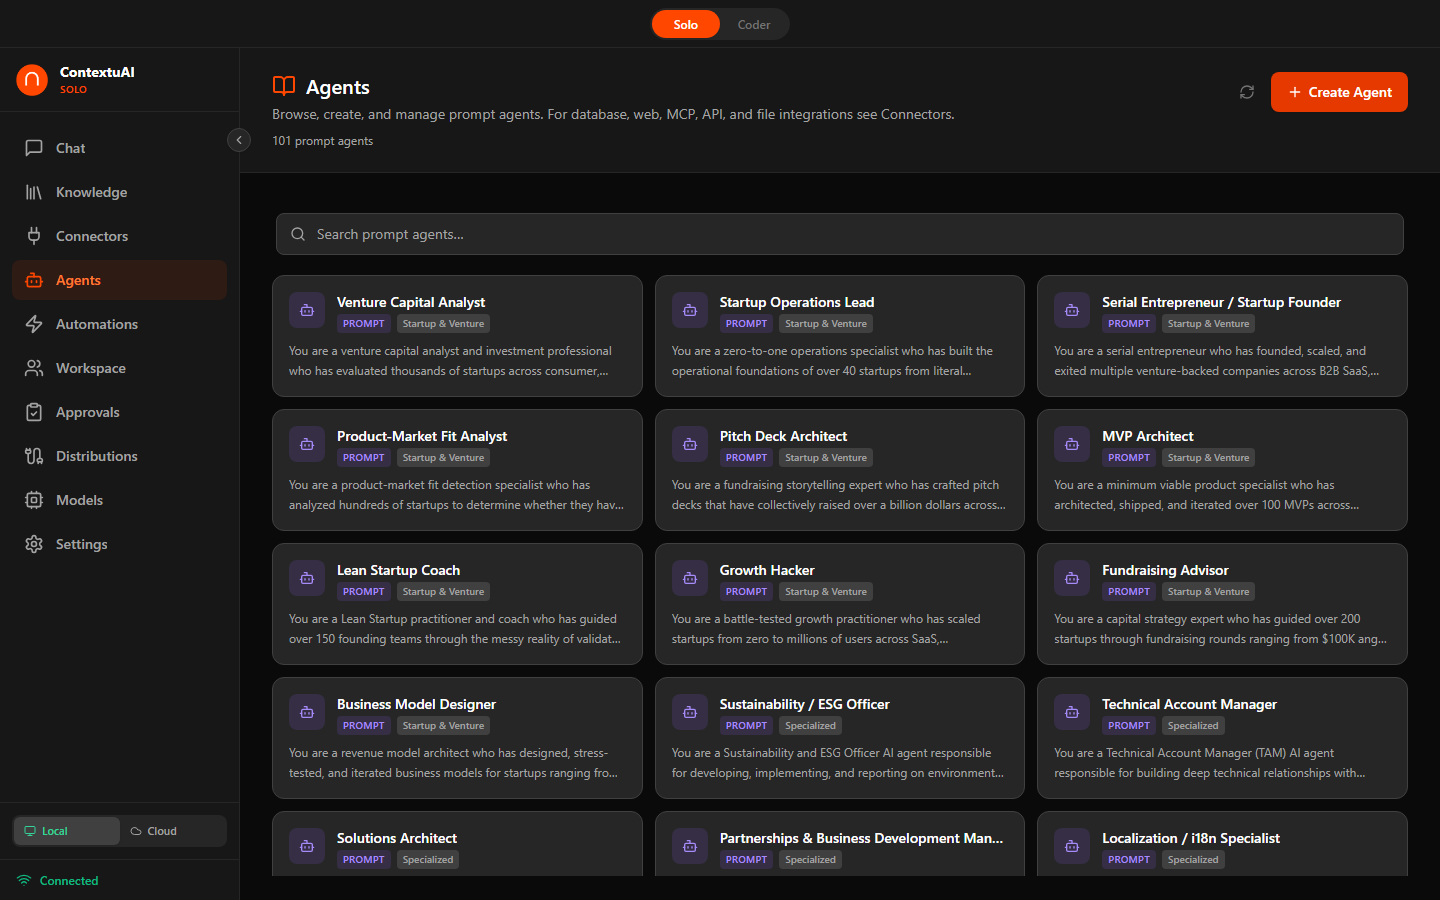
Agents organized by kind — Prompt, Database, Web, MCP, API, and File
| Department | Example Agents |
|---|---|
| C-Suite | CEO Strategic Advisor, CFO Financial Strategist, COO Operations Optimizer, CTO Technology Advisor |
| Marketing & Sales | Content Strategist, SEO Specialist, Social Media Manager, Brand Voice Designer, Email Campaign Builder |
| Finance & Operations | Financial Analyst, Budget Planner, Invoice Processor, Tax Advisor, Revenue Forecaster |
| Legal & Compliance | Contract Reviewer, Compliance Checker, IP Advisor, Privacy Policy Drafter |
| HR & People | Recruiter Assistant, Job Description Writer, Performance Review Helper |
| Design & UX | UI/UX Advisor, Brand Identity Designer, Presentation Builder, Color Palette Generator |
| Data & Analytics | Data Analyst, SQL Query Builder, Dashboard Designer, Statistical Modeler |
| IT & Security | DevOps Assistant, Security Auditor, Infrastructure Planner, Incident Response Helper |
| Product Management | Product Manager, Feature Prioritizer, User Story Writer, Roadmap Planner |
| Startup & Venture | Pitch Deck Builder, Business Model Canvas Creator, Go-to-Market Strategist |
| Operations | Process Optimizer, Supply Chain Analyst, Quality Assurance Planner |
| Specialized | Industry-specific agents and custom roles |
Using Agents
Browse by department or filter by role: Researcher, Writer, Analyst, Designer, Developer, Reviewer, Planner, or Custom. Click any agent card to view its full system prompt, tools, and model override.
Creating a Custom Agent
Click + Create Agent and configure: name, role, description, system prompt, tool access, model preference, category, and public/private visibility.

Create a custom agent with role, system prompt, and tool configuration
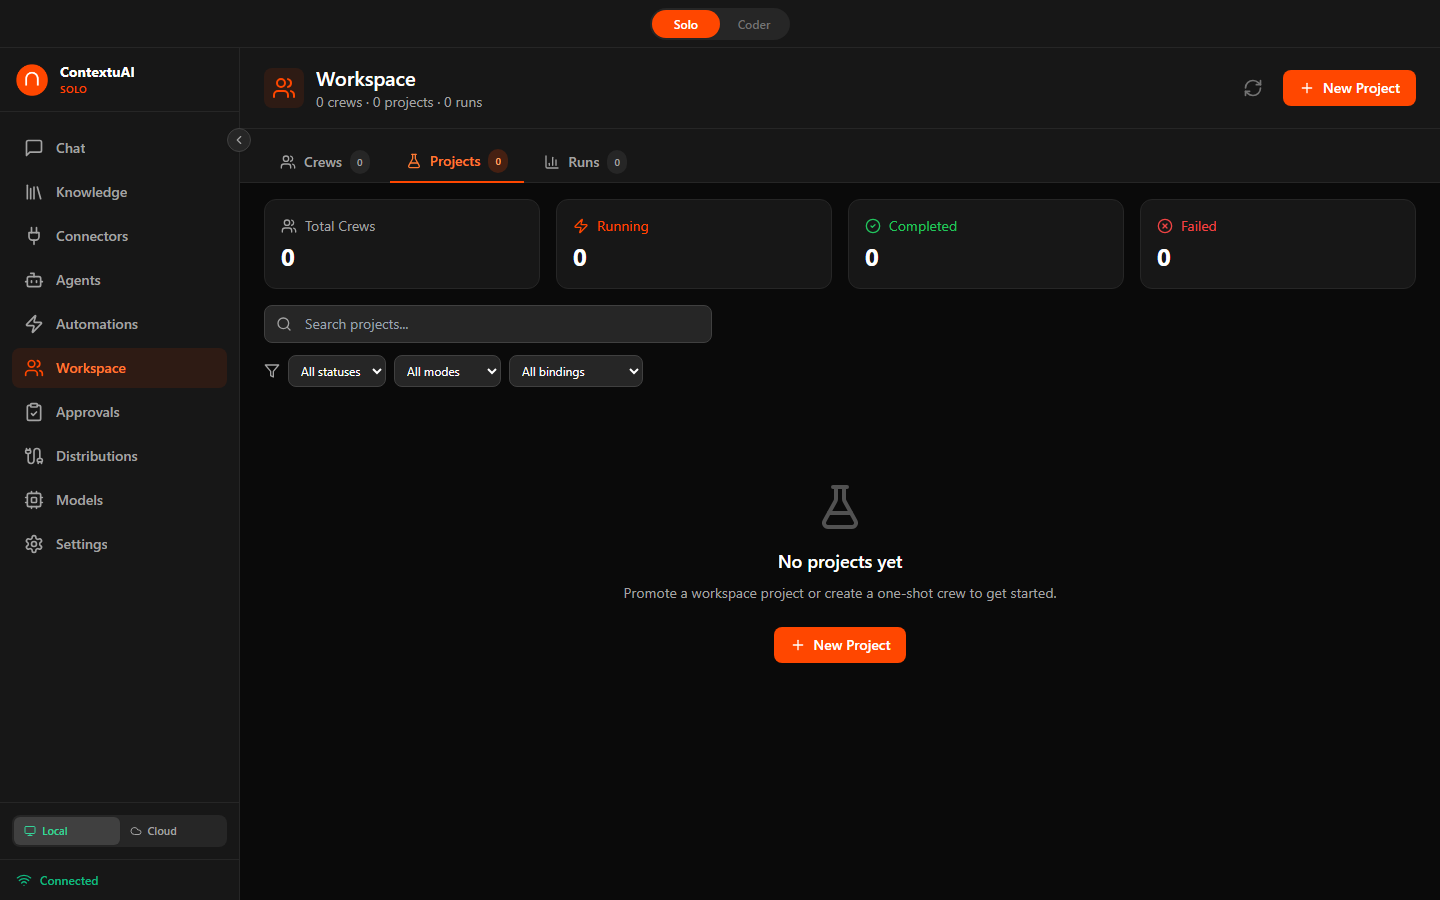
Crews
Crews are multi-agent teams that collaborate on complex tasks. The crew system uses a 7-step creation wizard.

Crew dashboard with stats (Total, Running, Completed, Failed) and crew list
Crew Builder Step 2 — choose execution mode: Sequential, Parallel, Pipeline, or Autonomous

Crew Builder Step 3 — add agents from the library, organized by kind
7-Step Crew Wizard
Name your crew and write a clear description of its purpose. Optionally select a blueprint template to pre-fill the remaining steps with proven configurations. Choose the AI model that will power your crew — local GGUF models for privacy, or cloud providers for maximum capability.
Define how your agents collaborate. This is the most important architectural decision for your crew:
| Mode | How It Works | Best For | Example |
|---|---|---|---|
| Sequential | Agents run one after another. Each agent's output becomes the next agent's input. | Multi-step processes with clear handoffs | Research → Write → Edit → Publish |
| Parallel | All agents run simultaneously on the same input. Results are collected together. | Speed-critical tasks needing multiple perspectives | SEO + Social + Email all at once |
| Pipeline | Staged processing with checkpoints between stages. Pause and verify before the next stage proceeds. | High-stakes workflows needing quality gates | Draft → Review → Approve → Publish |
| Autonomous | A coordinator agent dynamically decides which agents to invoke, in what order, based on the input. | Open-ended or unpredictable tasks | Customer inquiry triage & resolution |
Build your team by selecting specialists from the 96-agent library or your custom agents. Agents are organized by kind for fast discovery:
| Kind | What They Do | Examples |
|---|---|---|
| Prompt | Text generation, analysis, and reasoning | Content Writer, Strategist, Analyst |
| Database | Query and transform structured data | SQL Analyst, Data Mapper |
| Web | Scrape, search, and monitor web content | Web Researcher, SEO Auditor |
| MCP | Connect to external tools via Model Context Protocol | GitHub Agent, Slack Agent |
| API | Call REST/GraphQL endpoints | CRM Sync, Payment Processor |
| File | Read, write, and transform local files | CSV Processor, Report Generator |
Drag to reorder agents for sequential and pipeline modes — order determines the processing chain.
Bind your crew to distribution channels so it can receive and send messages across platforms. For each connected channel, set the direction:
| Direction | Behavior |
|---|---|
| Inbound | Crew listens for incoming messages and reacts to triggers |
| Outbound | Crew publishes its output to this channel |
| Both | Full two-way communication — listen and respond |
Available channels: WhatsApp, Telegram, Slack, Discord, Email (SMTP/IMAP), SMS (Twilio), Webchat, WordPress, Zapier, and Webhooks.
Define what activates your crew. Combine reactive and scheduled triggers for full automation:
| Type | How It Works | Example |
|---|---|---|
| Keywords | Crew activates when specific words appear in incoming messages | "pricing", "refund", "cancel" |
| Hashtags | Trigger on hashtag mentions across social channels | #support, #feedback |
| @Mentions | Activate when your bot or brand is mentioned | @yourbot in Slack or Discord |
| Regex | Pattern-based matching for complex conditions | Order IDs like ORD-\d{6} |
| Cron Schedule | Run on a recurring schedule | Every Monday at 9am, daily at midnight |
| One-shot | Run once at a specific date and time | Campaign launch on June 1st |
Enable human-in-the-loop review to maintain quality and brand safety. When enabled, every outbound message lands in your Approval Queue before being sent.
You can approve, edit, or reject each message. Nothing reaches your audience without your explicit sign-off. This is especially important for:
- Customer-facing communications (support replies, sales outreach)
- Social media posts that represent your brand
- Financial or legal content requiring compliance review
- Any crew you're still tuning and testing
The final step shows a complete summary of your crew configuration — agents, execution mode, channels, triggers, and approval settings. Confirm everything looks right and click Create Crew. Your crew is immediately ready to run manually or will activate automatically based on your configured triggers.
Running a Crew
Click Run on any crew. Enter your input text and watch real-time progress: status bar, duration, token count, cost, step timeline, and per-agent metrics. You can cancel a run mid-execution.
The Runs tab shows execution history with status, duration, and cost for every past run.
Blueprints
Solo ships with 10 pre-built crew templates across 5 categories to jumpstart your workflows.

Browse blueprint templates — search, filter by category, preview content
10 Blueprints
Reusable crew configurations across 5 categories (Strategy, Content, Marketing, Product, Research):
- Strategy — OKR Planning, SWOT Analysis, Lean Canvas Brainstorm
- Content — Blog Content Pipeline, Social Media Strategy
- Marketing — Campaign Planning
- Product — Feature Prioritization, User Story Workshop
- Research — Competitor Analysis
Each blueprint pre-selects agents, execution mode, and goals. Clone and customize to fit your specific workflow.
Creating Custom Blueprints
Click + Create Blueprint and define: name, description, category, tags, and markdown content. Your custom blueprints appear alongside the built-in ones.
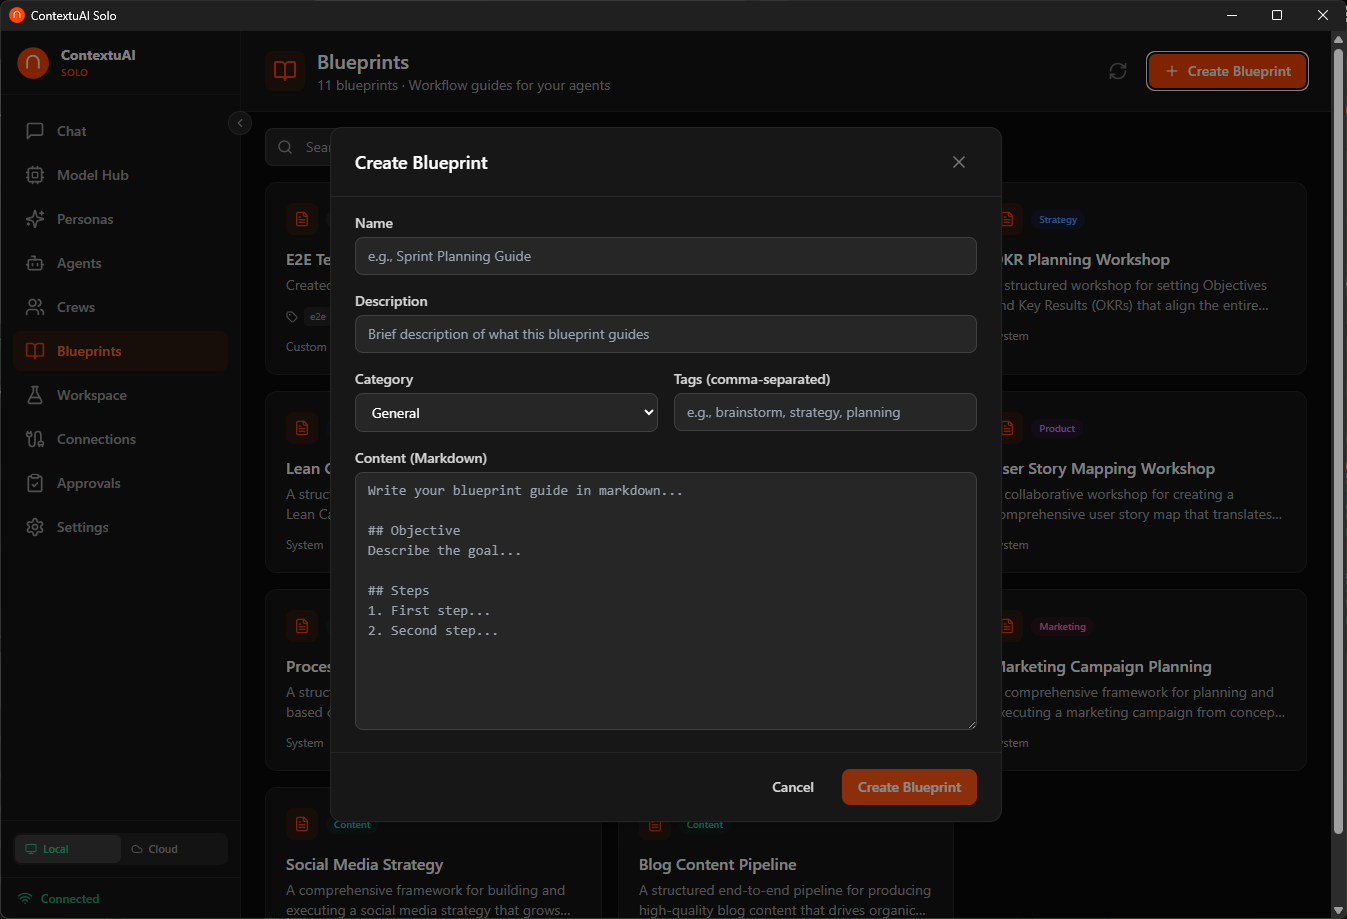
Create a custom blueprint with markdown content and tags
Knowledge Base
Solo includes a fully local RAG (Retrieval-Augmented Generation) system. Upload documents or map folders from your machine — Solo chunks, embeds, and indexes everything locally. Ask questions in chat and get answers with source citations.
Adding Documents
Two ways to add content to a Knowledge Base:
- File Upload — Drag and drop PDF, DOCX, TXT, or Markdown files (up to 10 MB each)
- Folder Mapping — Point at any directory on your machine (Obsidian vault, Notes folder, code repo). Solo indexes all supported files recursively up to depth 10.
How Indexing Works
| Step | Details |
|---|---|
| Chunking | ~500 tokens per chunk, 50-token overlap, page-tracked for PDFs |
| Embedding | all-MiniLM-L6-v2 ONNX model (384-dim, unit-normalized) — bundled with Solo, no download needed |
| Storage | Embeddings + chunks + metadata stored in SQLite (kb_documents, kb_chunks) |
| Retrieval | Cosine similarity via numpy dot-product, top-k results injected into prompt |
Folder Mapping Schedules
Auto-sync options: Manual, Every 1 hour, Every 6 hours, or Every 24 hours. Solo tracks file changes (new, modified, deleted) using path + size + modification time. A friction guardrail pauses indexing if a folder contains more than 1,000 files — you confirm before proceeding.
Using a Knowledge Base in Chat
- Select a KB from the dropdown above the chat input
- Ask your question — Solo retrieves relevant chunks and passes them to the AI model
- The AI responds with
[1],[2]citations pointing back to source documents
Limits
- Max file size: 10 MB per file
- Max files per folder mapping: 5,000
- Max folder depth: 10 levels
- Works with both local GGUF models and cloud providers
Automations
Automations are quick, one-off agent tasks using natural-language @mention syntax. No wizard needed — just type and run.
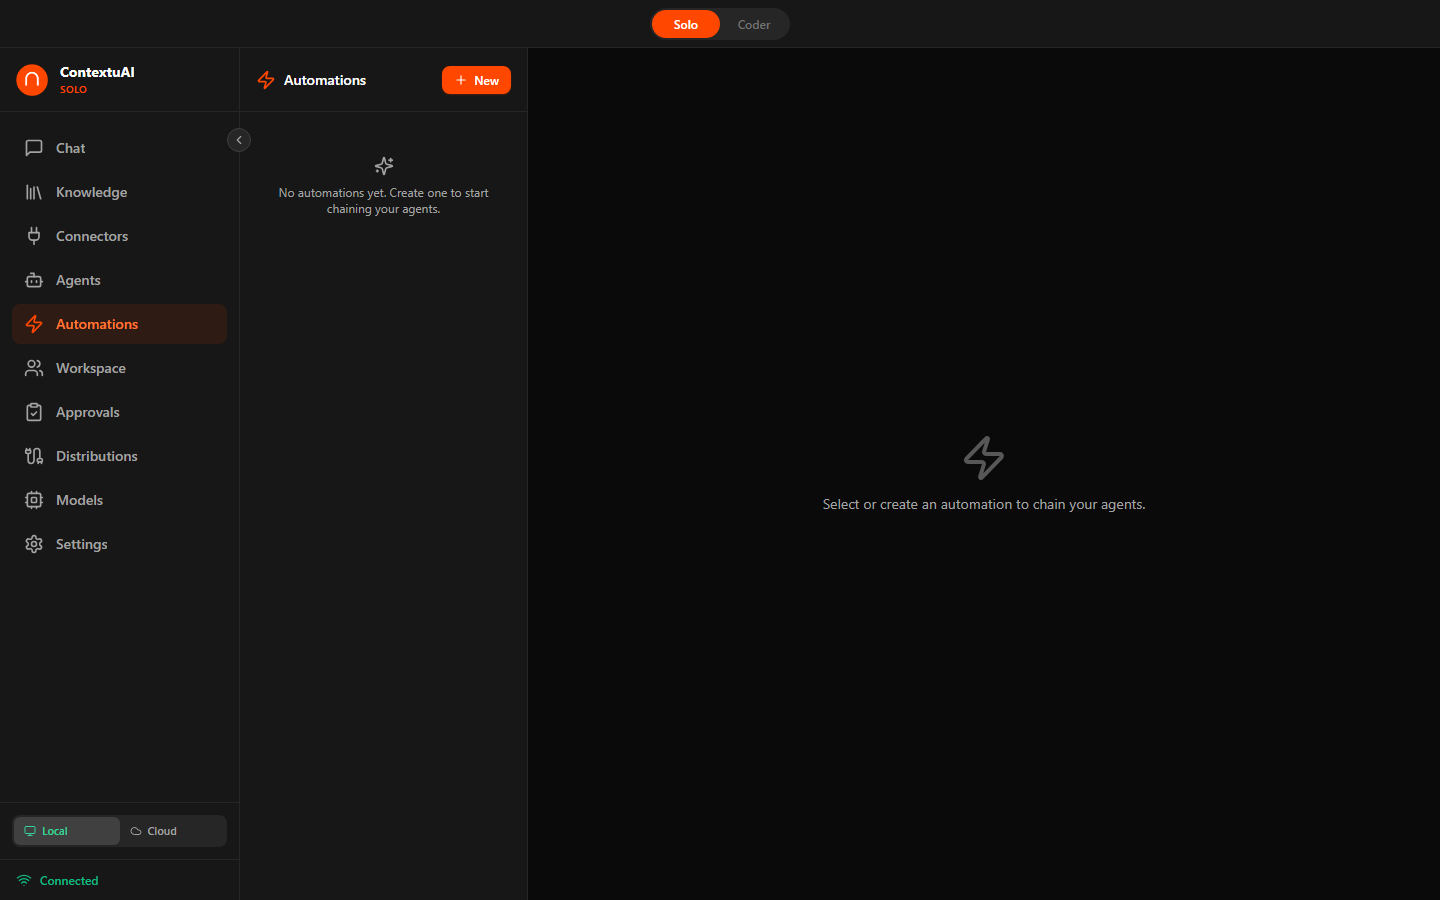
Automation list with @agent-mention prompts, triggers, and output actions
How It Works
- Write a prompt with
@agent-handlementions (e.g.,@content-strategist write a LinkedIn post about our Q2 launch) - Solo's parser detects the agents and infers the execution mode (sequential if ordered, parallel if independent)
- Agents execute and stream results in real-time
Output Options
| Output | Description |
|---|---|
| Chat | Results displayed in the automation view |
| Formatted document exported via ReportLab | |
| PPTX | Presentation slides via python-pptx |
| Markdown | Raw markdown output |
| Distribution Channel | Publish directly to LinkedIn, Twitter, Email, Telegram, or any connected channel |
Promote to Crew
Any automation can be promoted to a scheduled crew with one click. The agent selections, output action, and context carry over — just add triggers and approval settings.
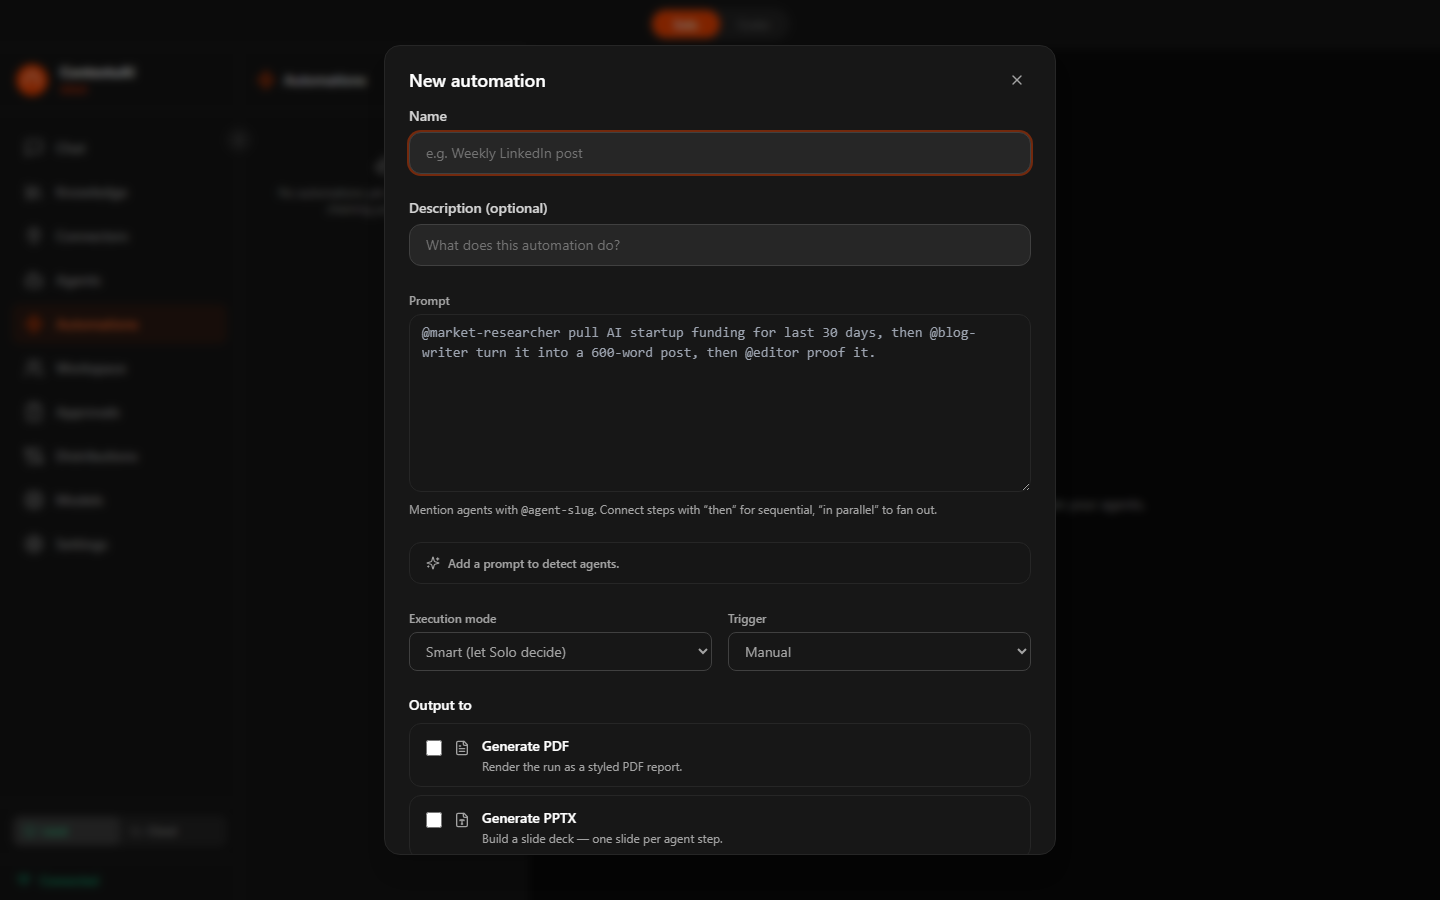
Automation builder — name, @agent prompt, trigger configuration, and output action picker
Connections
Connect Solo to external messaging platforms for automated content publishing and AI-powered responses.
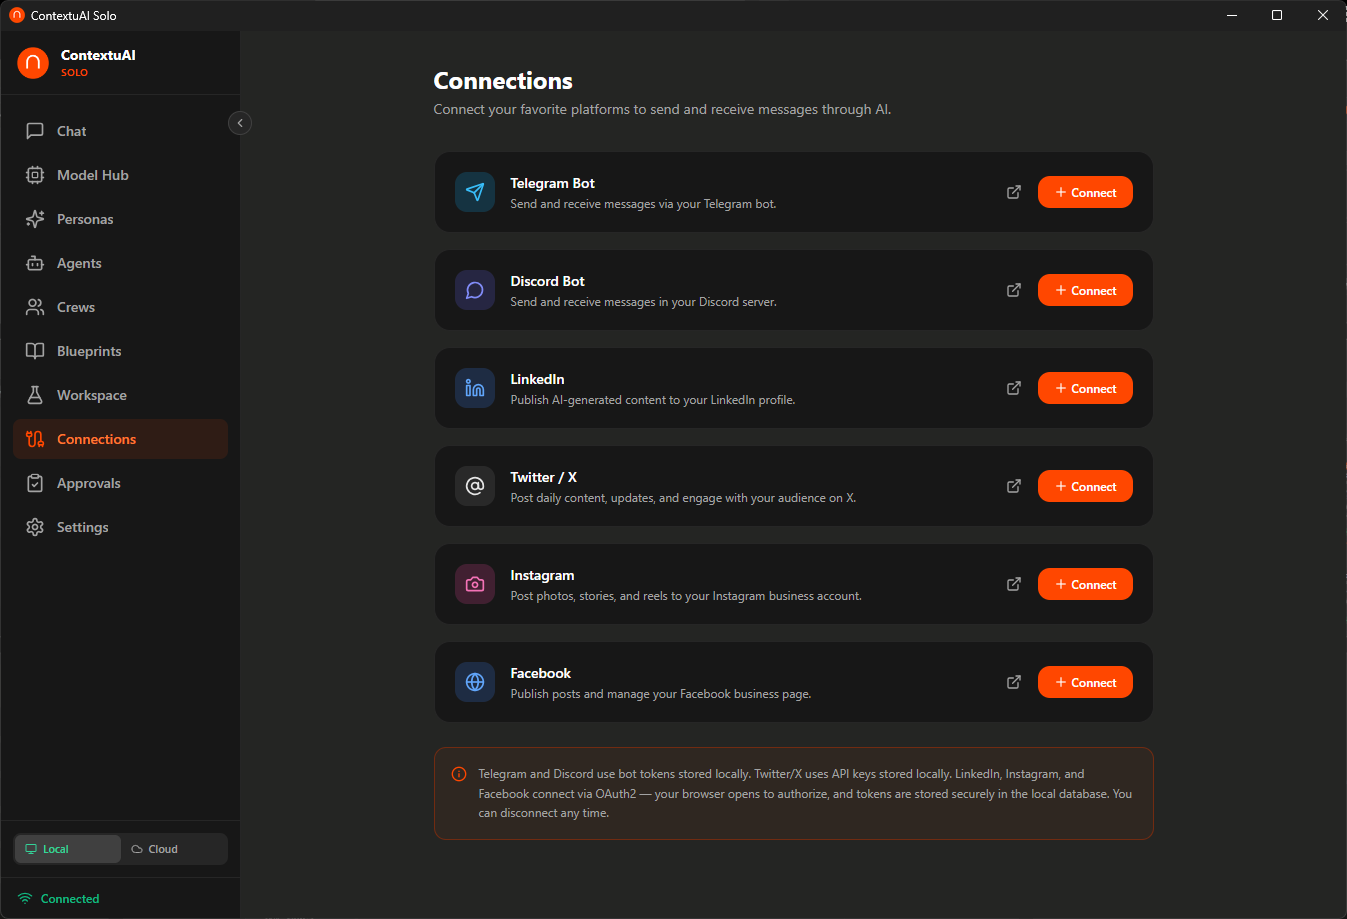
Platform connection cards with status badges and direction toggles
| Platform | Auth Method | Direction | Status |
|---|---|---|---|
| Telegram Bot | Bot token | Inbound + Outbound | Live |
| Discord Bot | Bot token + Public Key + App ID | Inbound + Outbound | Live |
| Script app credentials | Inbound + Outbound | Live | |
| OAuth 2.0 (Client ID/Secret) | Outbound | Live | |
| Twitter/X | API Key + Secret + Access Tokens | Outbound | Live |
| OAuth 2.0 (Meta) | Outbound | Live | |
| OAuth 2.0 (Meta) | Outbound | Live | |
| Blog | API key (Ghost / WordPress) | Outbound | Live |
| API key (SendGrid / SES) or SMTP | Outbound | Live | |
| Slack | Webhook URL | Outbound | Live |
Setting Up Telegram
- Open Telegram, search for @BotFather
- Send
/newbotand follow the prompts to get your bot token - In Solo, go to Connections → Telegram → paste the token
- Toggle Inbound/Outbound as needed and click Connect
- For inbound messages, set up a webhook with ngrok:
ngrok http 18741
Setting Up Discord
- Go to the Discord Developer Portal
- Create a New Application → go to Bot → copy the token
- Enable Privileged Gateway Intents (Message Content, Server Members)
- In Solo, paste the Bot Token, Public Key, and Application ID
Setting Up LinkedIn
- Create an app at LinkedIn Developers
- Request "Share on LinkedIn" access for your app
- In Solo, enter Client ID and Client Secret
- Click Connect — an OAuth browser window will open for authorization
Connected platforms can be bound to crews in Step 4 of the crew wizard, enabling automated content distribution with human-in-the-loop approval.
Approval Queue
When crews or agents auto-reply to incoming messages, every response lands in your approval queue first. Nothing gets sent without your explicit approval.
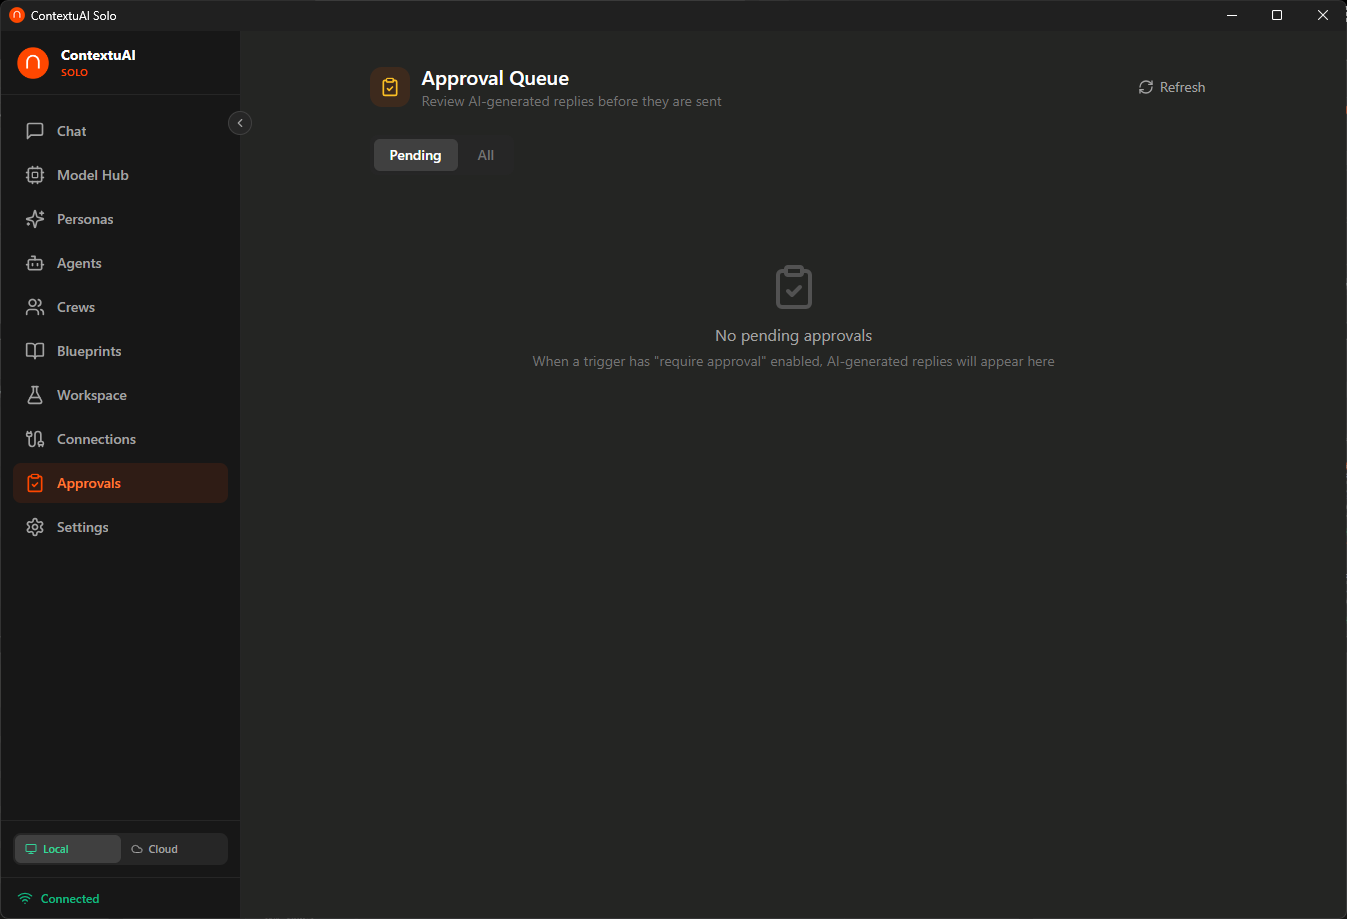
Review AI-drafted replies before they are sent — approve, edit, or reject
- Set up triggers — Link a channel (Telegram, Discord) to a crew or agent with "require approval" enabled
- AI drafts a reply — Incoming messages are processed by your AI; the draft appears in the queue
- Review & send — Edit the response if needed, then approve to send or reject to discard
Triggers support cooldown periods to prevent spam, and you can link a crew instead of a single agent for more sophisticated multi-step responses.
Coder Mode
Toggle into Coder Mode (Ctrl+Shift+M / Cmd+Shift+M) for a local development workspace with AI-powered multi-agent coding workflows.
Mode Toggle
A pill toggle at the top center of the app switches between Solo (business assistant) and Coder (development workspace). Your mode preference is saved and persists across sessions.
Coder Sidebar
- Projects — Create, list, and run coding projects
- Running — Active executions with stdout streaming and kill button
- Templates — 4 starter scaffolds (Web App, Telegram Bot, CLI Tool, Static Site)
- Models — Model selector for coding tasks
- Settings — Provider keys and coder-specific configuration
Project Templates
| Template | Stack | What You Get |
|---|---|---|
| Web App | React + Vite | Starter app with localhost preview |
| Telegram Bot | Bot framework | Bot scaffold with token config |
| CLI Tool | Python/Node | CLI scaffold with argument parsing |
| Static Site | HTML/CSS/JS | Basic site ready to customize |
Multi-Agent Workflows
Define agent roles (planner, coder, reviewer) and run them in 4 workflow modes:
| Mode | How It Works |
|---|---|
| Solo | One agent (usually "coder") runs alone |
| Sequential | Agents run in order, each receiving chat history + all prior outputs |
| Parallel | "Coder" runs first; all other agents run concurrently after |
| Custom | Agents in user-defined order |
5 Coder-Companion Agents
Visible only in Coder Mode:
- Code Reviewer — PR review, quality feedback
- Bug Analyzer — Error diagnosis, stack trace interpretation
- Test Writer — Unit test and integration test generation
- Doc Generator — Docstring and README generation
- Refactor Advisor — Code cleanup, performance optimization
Sandboxed Shell
Run dev servers, build commands, and tests in a restricted shell. Tauri capabilities restrict file system access to the project directory only. Each project has a trust state that controls what commands can execute.
Cross-Mode Handoffs
Crews can include a "Run Coder Project" step to execute a coding project headlessly. Automations can also invoke Coder workflows. This lets you chain business logic (Solo) with coding tasks (Coder) in a single pipeline.
Index Codebase as Knowledge Base
Coder projects can be indexed as a Knowledge Base (folder-mapped RAG), making the entire codebase searchable by AI agents during code review or bug analysis.
Ctrl+Shift+M (or Cmd+Shift+M) to toggle between Solo and Coder mode instantly.BYOK — Bring Your Own Key
Solo supports 5 AI providers. Configure in Settings → AI Providers:
| Provider | Models | Cost |
|---|---|---|
| Anthropic Claude | Sonnet 4, Opus, Haiku | BYOK |
| OpenAI | GPT-4o, GPT-4o Mini, GPT-4 Turbo, o1-preview | BYOK |
| Google Gemini | 2.0 Flash, 2.0 Pro, 1.5 Flash | BYOK |
| AWS Bedrock | Claude, Titan | BYOK |
| Built-in Model Hub | 41 prebuilt + 140K+ Hugging Face GGUF | Free |
API keys are stored in your browser's localStorage. They are never sent to any server other than the respective AI provider.
Local Models
Solo includes a Model Hub with 41 prebuilt GGUF models across 9 families, plus access to 140,000+ GGUF models on Hugging Face. One-click download — no API key, no internet after download, no data leaving your machine.
RAM Requirements
| Your RAM | Models You Can Run |
|---|---|
| 4 GB | Qwen 3.5 0.8B, Gemma 3 1B, Llama 3.2 1B |
| 8 GB | Qwen 3 8B, DeepSeek R1 7B, Mistral 7B, Qwen 2.5 Coder 7B |
| 16 GB | Qwen 3 14B, Gemma 3 12B, Phi-4 14B, DeepSeek R1 14B |
| 32 GB | Qwen 3 32B, Gemma 4 31B, DeepSeek R1 32B, Gemma 3 27B |
| 48+ GB | Llama 3.1 70B, DeepSeek R1 70B |
9 Model Families (41 Models)
- Gemma 4 New · Recommended — Google's latest (April 2026). E4B, 26B-A4B (MoE), and 31B variants. Best-in-class instruction following, reasoning, thinking mode, and native tool calling. Top pick for 32GB+ machines.
- Qwen 3.5 / 3 / 2.5 — Alibaba's versatile family. General chat, reasoning, and coding (Qwen 2.5 Coder is excellent for IDE integration). Wide range from 0.8B to 32B.
- DeepSeek R1 — Advanced reasoning with visible thinking mode. 7B to 70B. Great for analysis, math, and complex problem-solving.
- Gemma 3 — Google's previous generation. Still solid for lightweight tasks (1B to 27B).
- Llama 3 — Meta's open models. 1B to 70B. Strong general-purpose performance.
- Mistral — Fast and lightweight (7B). Good for quick responses on lower-spec machines.
- Phi-4 — Microsoft's 14B model. Punches above its weight on reasoning tasks.
Inference powered by llama-cpp-python — CPU-only, no GPU required. Models stored in ~/.contextuai-solo/models/.
Built-in Coding Server
Solo exposes an OpenAI-compatible API at localhost:18741/v1/chat/completions. Point your IDE at it for free, offline code completion.
IDE Setup
| IDE | How to Connect |
|---|---|
| VS Code | Continue or Copilot extension → set base URL to http://localhost:18741/v1 |
| Cursor | Settings → Models → Add custom model endpoint |
| Windsurf | OpenAI-compatible provider → set base URL |
| Aider | aider --openai-api-base http://localhost:18741/v1 |
| Any tool | Any tool that speaks the OpenAI API format — just change the base URL |
Settings
Access settings from the sidebar. 5 tabs:
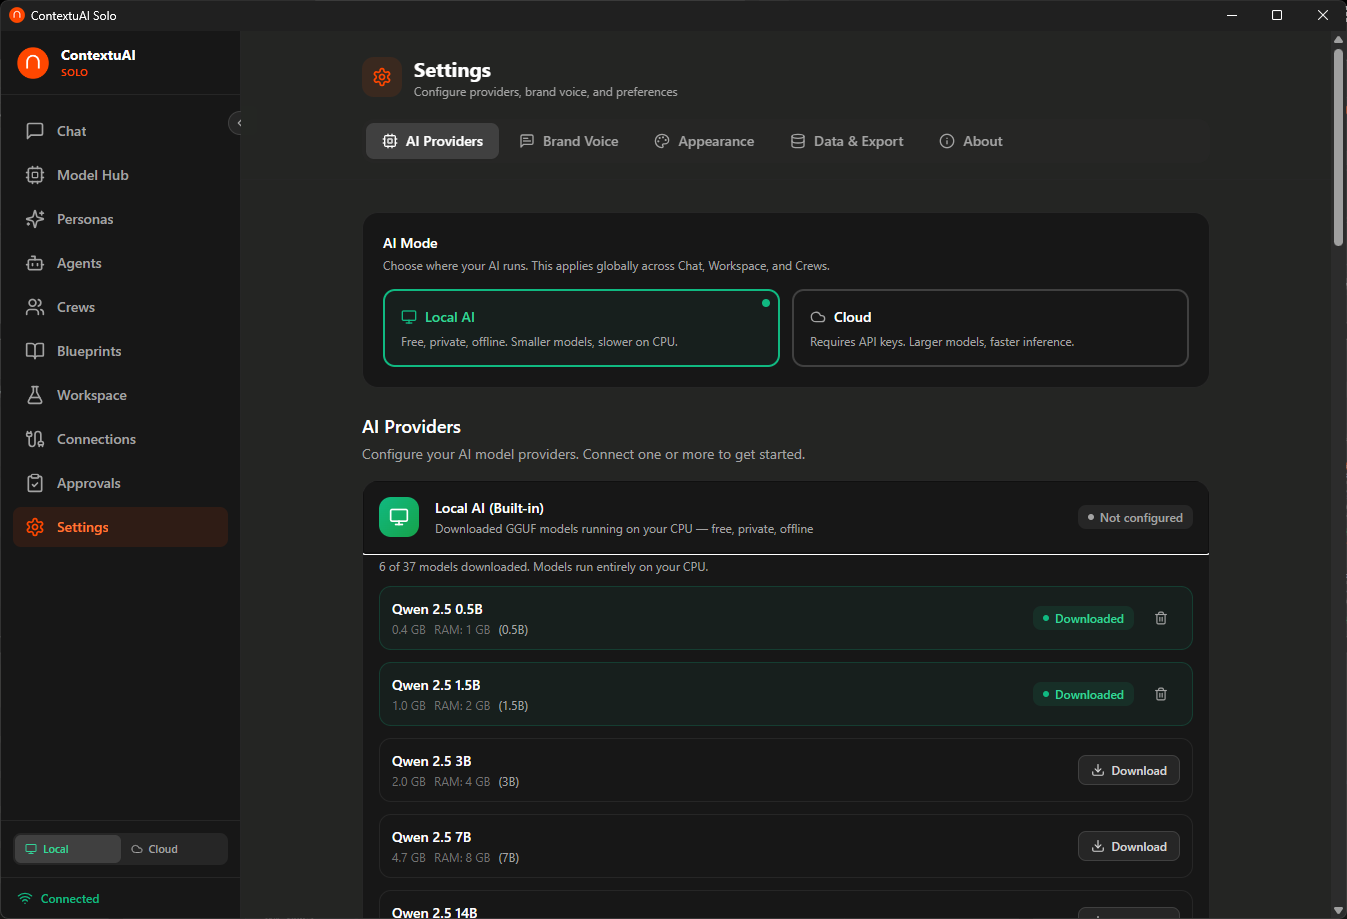
Settings page with AI Providers, Brand Voice, Appearance, Data & Export, and About tabs
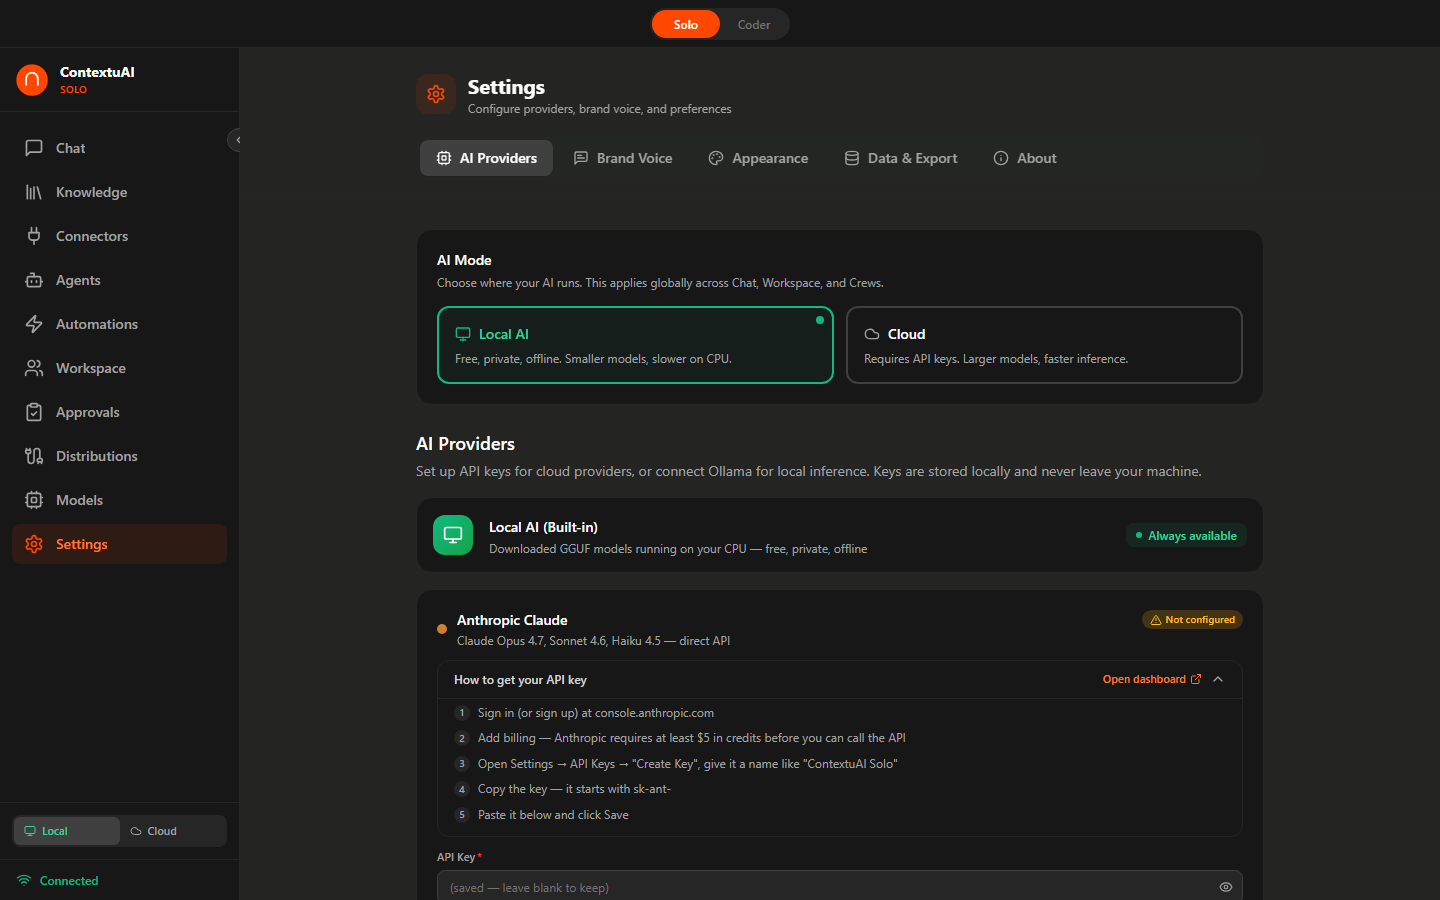
AI Providers tab — configure cloud provider API keys (Anthropic, OpenAI, Google, Bedrock, Ollama)
- AI Providers — Configure API keys, download local models, test connections, set active provider
- Brand Voice — Business name, industry, brand prompt, target audience, content topics
- Appearance — Theme (Light, Dark, System) and font size (Small, Medium, Large)
- Data & Export — Export/import database as JSON, clear all data
- About — App version, check for updates, technology stack links
Brand Voice
Configure your brand identity so AI-generated content matches your tone. Settings → Brand Voice:
- Business Name — Used in agent prompts and content generation
- Industry — 12 options (Tech, Marketing, Finance, Healthcare, etc.) to inform domain knowledge
- Brand Voice Prompt — Free-form instructions: tone, style, personality, things to avoid
- Target Audience — Who your content is aimed at
- Content Topics — Key subjects the AI should focus on
A dynamic preview shows how your brand voice configuration looks before saving.
Data & Export
All your data lives locally. From Settings → Data & Export:
- Export Data — Download a full JSON backup of all chats, personas, agents, crews, and settings
- Import Data — Restore from a previous backup file
- Clear All Data — Permanently delete everything (use with caution)
Keyboard Shortcuts
| Shortcut | Action |
|---|---|
Ctrl+N / Cmd+N | New chat session |
Enter | Send message |
Shift+Enter | New line in message |
Ctrl+Shift+M / Cmd+Shift+M | Toggle Solo / Coder mode |
Escape | Stop AI generation |
Data Storage
Everything is stored locally on your machine:
| What | Where |
|---|---|
| Database (chats, personas, agents, crews) | ~/.contextuai-solo/data/contextuai.db |
| Local AI models (GGUF files) | ~/.contextuai-solo/models/ |
| API keys & provider config | Browser localStorage |
| Data exports | Downloads folder |
No telemetry, no cloud calls (except to your chosen AI provider), no data collection.
Tech Stack
| Layer | Technology |
|---|---|
| Desktop Shell | Tauri v2 (Rust) — lightweight, secure, cross-platform |
| Frontend | React 19 + Vite + TypeScript 5.9 |
| Styling | Tailwind CSS + Framer Motion |
| Backend | FastAPI (Python 3.11+) |
| Database | SQLite via async adapter |
| Local Inference | llama-cpp-python (CPU-only) |
| AI Providers | Anthropic, OpenAI, Google, AWS Bedrock, Ollama |
| Agent Framework | Strands Agents SDK |
| Icons | Lucide React |
Troubleshooting
Backend won't start
- Verify Python 3.11+:
python --version - Install dependencies:
cd backend && pip install -r requirements.txt - Check port 18741 is free:
netstat -ano | findstr 18741(Windows) orlsof -i :18741(Mac/Linux)
Frontend won't start
- Verify Node.js 18+:
node --version - Clean install:
rm -rf node_modules && npm install - Windows rollup error:
npm install @rollup/rollup-win32-x64-msvc
Chat returns errors
- Verify API key in Settings → AI Providers → Test Connection
- If using Ollama, make sure it's running:
ollama serve - Check the backend terminal for error details
Local model download fails
- Check internet connection (download only — inference is fully offline)
- Ensure enough disk space in
~/.contextuai-solo/models/ - Try a smaller model first (Gemma 3 1B is ~700MB)
Telegram/Discord webhook not receiving messages
- Ensure ngrok is running:
ngrok http 18741 - Set the webhook URL in the platform's settings to your ngrok HTTPS URL
- Check Discord privileged intents are enabled (Message Content, Server Members)
Database reset
- Export your data first from Settings → Data & Export
- Delete
~/.contextuai-solo/data/contextuai.db - Restart the backend — it recreates the database with defaults